
Pose of the Week – Triangle
Before we dig into this week’s Pose of the Week, don’t miss these posts:
If you want to make a request for a pose to be covered, email my office or leave a comment at the bottom of this post.
The question:
What is the most effective therapeutic way to practice triangle in order to preserve and protect the hip while maximizing strength and mobility AND minimizing injury risk?


The answer:
Ok, well first, doing all that in this pose is a TALL order. We need to:
- Stay safe in triangle pose, which includes making it universally safe for anyone.
- Build strength and balance it with mobility in a sustainable way, which means doing triangle pose in a way that won’t cause premature joint aging or degeneration.
- Prevent injury in triangle pose. Triangle pose is a complex, triplanar pose, which means there are multiple planes of alignment. Whereas Warrior I and II take place in singular planes of movement. This means there are less degrees of freedom, or put simply: less room for error.
Building a Safe & Effective Triangle Pose
With safety and efficacy as our no. 1 priority, the short answer to this complex question rests with a singular variable. The variable that may the most important in determining what YOUR TRIANGLE POSE looks like is called FEMORAL VERSION.
Femoral version is a term that has been around for decades, but the utility of it really wasn’t relevant, or so we thought, until the advent of better diagnostic technology that allowed the scientific community to develop measures to prevent premature degeneration of the hip, and as a result, hip replacement surgery.
It is thought that hip replacement surgery might have been preventable in a large number of cases had hip arthroscopy been available, as well as the rehabilitation to go with it, in previous decades.
Thankfully, we now have advanced methods of not only viewing the hip, but addressing the problems that can plague it. This is making life livable again for scores of folks with hip labral and impingement injuries.
But what does femoral version have to do with hip health? And what does it have to do with triangle pose? Femoral version describes the angular measurement of the femoral neck as compared against the distal femoral condyles.
What does femoral version mean in plain English?
Have a look at this illustration below (Figure 4.25) from my book Medical Therapeutic Yoga.
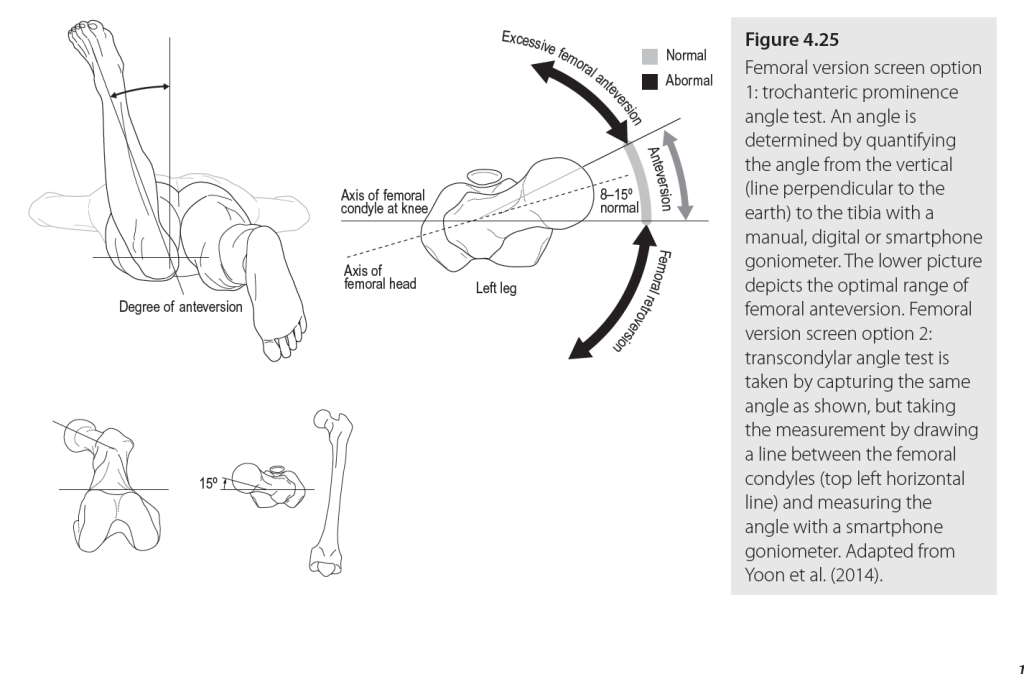
Here’s how femoral version is measured in the clinic:
- In the figure, you can see a person lying on their stomach (prone-lying) with their knee bent (flexed) to approximately 90 degrees. A measurement is taken by palpating (touching) the greater trochanter (the part of the hip you can feel from the side of your pelvis) and centering it up in the middle of the upper thigh by internally and externally rotating the femur until the “centered” position is achieved.
- The angle as demonstrated in the photograph, is called the femoral version angle and can be taken with a digital or manual goniometer from the vertical axis of the tibia or a horizontal level line drawn between the two distal femoral condyles.
- A “normal” range for femoral anteversion is between 8-15 degrees from the vertical, where the femur is slightly internally rotated. Anything above that measurement (greater than 15 degrees) is considered excessive femoral anteversion. Anything less than roughly 8-15 degrees (I typically use 15 degrees as a cutoff) is considered femoral retroversion.
- Seem complicated? Watch the video below where I demonstrate the test.
The femoral version test, demystified
Through CT scan studies, femoral version is correlated with a loss of normal physiological osteokinematic range of motion. This means:
- If a person has excessive femoral anteversion, then limited hip external rotation is present.
- If a person has femoral retroversion then limited internal rotation is present.
- This has profound implications for the practice and prescription of yoga, whether when used by a yoga teacher, yoga therapist, or healthcare provider in clinical or wellness practice.
Do in Triangle Pose
✅ Do bend both knees IF you have known hip impingement or if you have groin pain when you bring your knee to the chest using a hip telescope approach. If you are not familiar with that movement, you can sign up HERE for a complementary video library that explains the basic Medical Therapeutic Yoga postures.
✅ Do optimize length/tension relationship of the pelvic floor by practicing the Hip Lock. Watch the video below.
✅ This is a TRIPLANAR pose. The pelvis is NOT aligned as if “in between two panes of glass.”
✅ Do screen your own hip joint before practicing any yoga posture. Triangle pose is one of the biggest offenders for hip and spine injury and is often taught incorrectly.
✅ The Three P’s – Protection, Preservation, and Performance – The goal of all MTY-aligned postures is to Protect and Preserve the joints while optimizing biopsychosocial Performance.
✅ Please ban the teaching cues below from your triangle pose vernacular:
“NEVER-USE CUES” for teaching Triangle Pose:
- “Square your pelvis.”
- “Put your body between 2 panes of glass.”
- “Square your pelvis as if it is between 2 planes of glass.”
- “Reach as far as you can down the front leg with your hand to support the pose.”
- “Go deeper in the pose, as you are able.”
- “The full expression of the pose looks like….”
These cues tempt injury, and some are just flat-out anatomically impossible. The offense of the FIRST THREE “NEVER-USE CUES” is that they are the equivalent of biomechanical torture. In other words, the position suggested by these cues may be possible for some hyper mobile or incredibly retroverted (femoral) hips, but it is not safe and not sustainable. It invites injury on multiple levels, especially to the bony, capsular, ligamentous, and labral components of the pelvis and hip. The LAST THREE “NEVER-USE CUES” can be applied to more postures than just triangle.
Perfect (aka full versions poses) don’t exist, especially in triangle pose, where safety and prevention of hip impingement or labral injury is paramount, alongside health of the sacroiliac joint, iliolumbar ligaments, pelvic floor, and soft tissue of the hamstrings and adductors, just to name a few.
Do nots in Triangle Pose
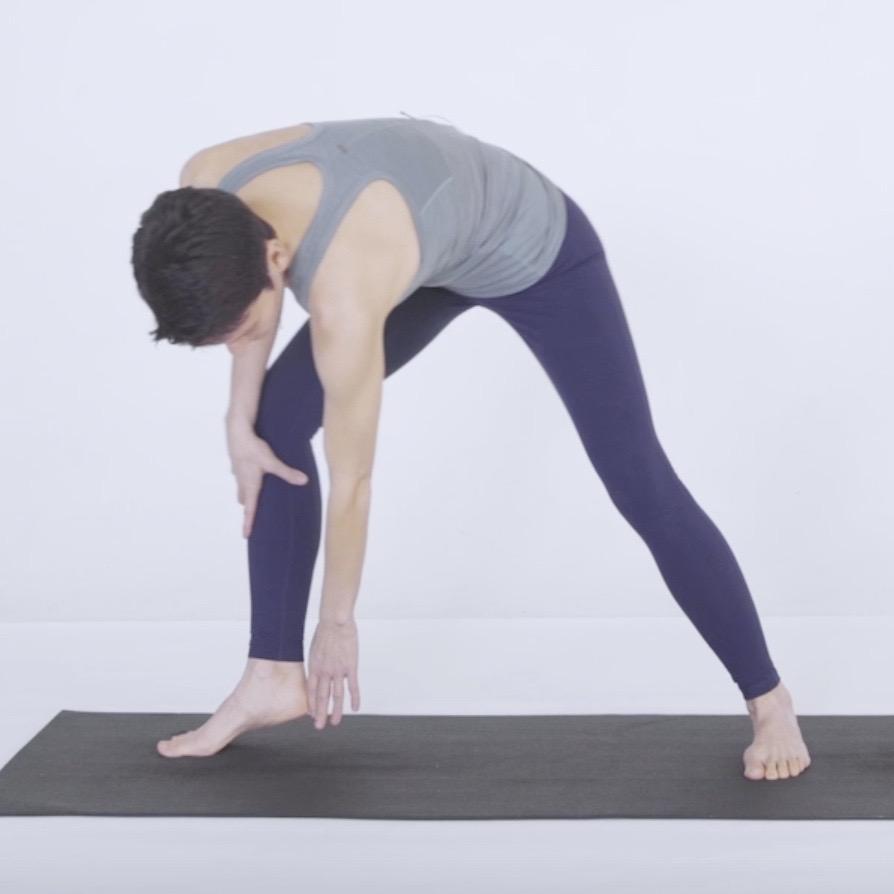
❎ Don’t do a “Trifecta Triangle.” Figures 3.20 and 3.21 are sustainable, while Figure 6.38 encourages the Trifecta. The “Trifecta of Injury” is the combined movements of spinal flexion, rotation, and side bending over a long lever arm. The moment arm of the head balances on the end of the spine is a vulnerable standing position that (unnecessarily) seeks extreme hip range of motion.
❎ Triangle is NOT a spinal side bend. There are other, safer ways to get spinal sidebending in. Triangle is NOT one of them.
❎ Don’t hang on your “Y” ligament. This means don’t dump your back leg forward and sway the low back. This is a LAZY pose and done long-term will create ligamentous laxity in the hip.
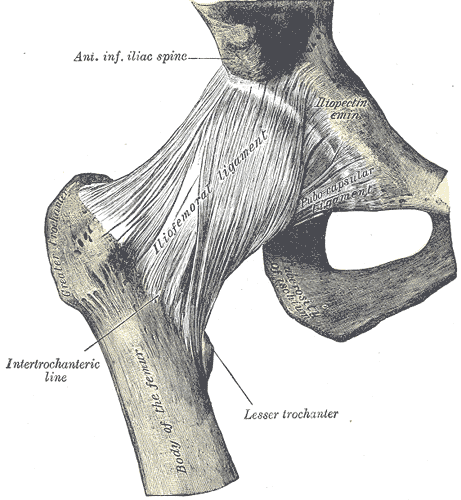
The iliofemoral “Y” ligament provides hip stability by resisting anterior shear in the femoracetabular “HIP” joint. Gray’s anatomy plate 339 Wikipedia-Public domain 
Figure 6.38 Trifecta of injury in Triangle Pose. GARNER, G. 2016. MEDICAL THERAPEUTIC YOGA. USED WITH KIND PERMISSION FROM THE AUTHOR & HANDSPRING PUBLISHING, LTD, UK.
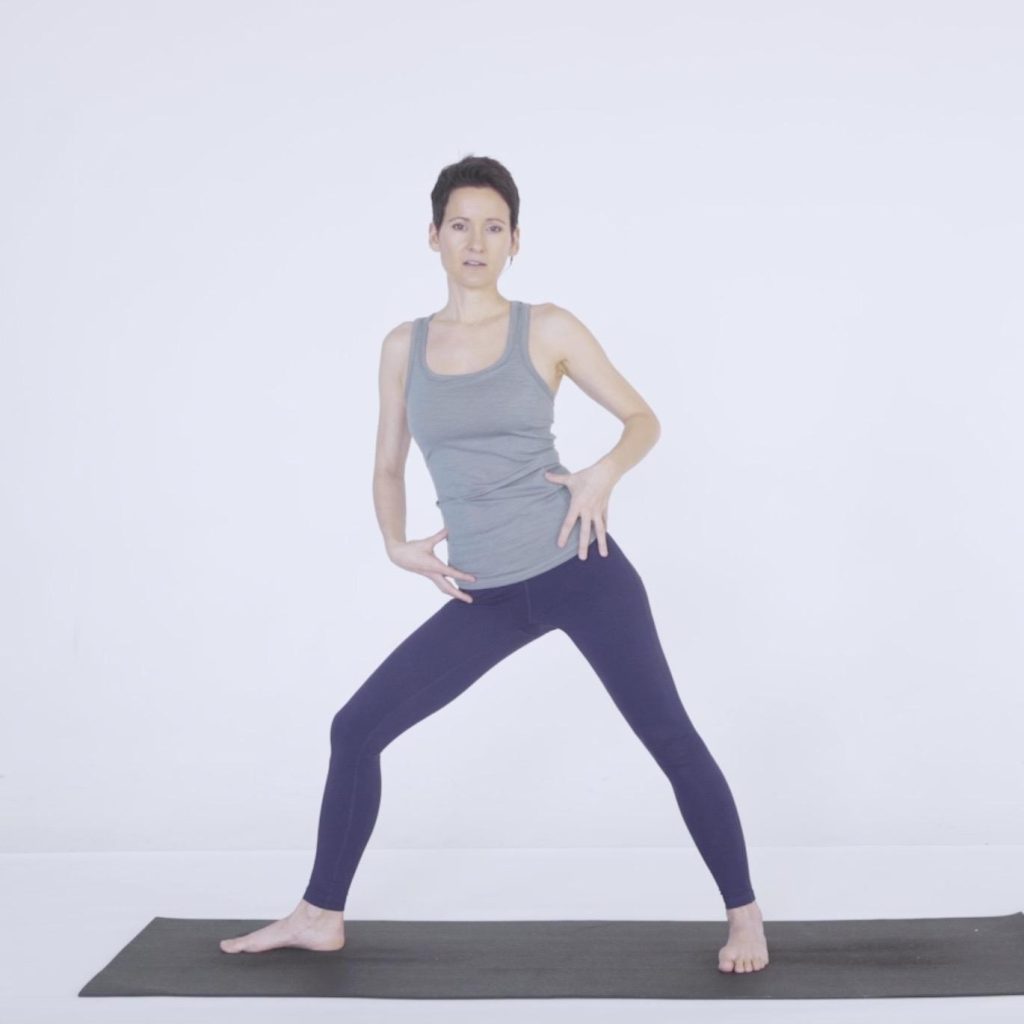
Figure 3.20 demonstrates a triplanar action of triangle pose, the foundation of safe performance. The trunk is kept in a relative spinal neutral position, along with the sacroiliac joint, because the pelvis is in a transverse plane. Modifications include:

- For Excessive Femoral Anteversion or Femoracetabular Impingement (false or true) – Flex/bend the knees slightly to create more space between the femur and acetabulum.
- For Femoral Retroversion – Avoid end range of motion at the hip (since they tend to have excessive hip external rotation and very limited hip internal rotation). Flex the back knee 5-10 degrees to mediate the pelvic obliquity required in the transverse plane position. If this isn’t done the pose creates a hip internal rotation and adduction moment, which is NOT a happy position for femoral retroversion.
Don’t Forget Your Breath in Triangle Pose
TATA Breath (practice for free below!) is necessary, especially during transitions, in order to transfer load safely from the trunk to lower extremity. It would also be quite helpful due to its biomechanical involvement in those who have pre-existing iliotibial band syndrome, back pain, sacroiliac joint pain, or general knee pain, due to the fascial and diaphragmatic components which tether the trunk and lower extremity in structure and function.

In FIGURE 3.21, those with an absence of TATD breath mastery could still perform the pose, but with external support (a chair, a ball, etc.). Those with less responsive posterior tissue in the back of the legs (it’s not just about the hamstrings folks, you’ve got fascial, neural, and vascular tissue that need as much attention as a needy Labrador Retriever) or a lack of hip awareness or mobility will also need to follow Figure 3.21 and not place the hand as far down the leg. Medical Therapeutic Yoga outlines and provides more illustrations on evidence-based modifications.
Triangle Can Be a Great Strength Builder
Safe Lifting (aka managing your own body weight) 101
Before we can lift weights successfully (and also to prevent injury), it is my belief that we have to learn to manage our own body weight first. For that reason, most people don’t need a gym to get fit. You have all the weight you need to lift right now – by lifting your own body. Triangle pose is an excellent opportunity to improve strength, mobility, balance, bone density, coordination, proprioception, and interoception.
If you also have a history of low back pain, hip pain, pelvic pain, or sacroiliac joint issues, or if you have some muscular weakness, you really need to avoid the “Trifecta Triangle” alignment. Focus on development of the TATD Breath (as above) in order to develop stronger internal support. This will help you transfer the load of the spine and progress in core strength and endurance.
Approach triangle pose the same way you think about safe lifting. In “safe lifting 101” we were all taught to lift with our legs not our backs. The same holds true here. We want to lift the trunk with our core muscles using the Locks system from the video above.
One more note on safe lifting! Performing the pose “MTY style” maximizes potential for optimizing pressure between the three diaphragms -vocal/laryngeal/cervicothoracic, respiratory, and pelvic. That means stronger abs, a more powerful voice, stronger lungs and a reliably strong pelvic floor.
Learn to optimize pressure between the three diaphragms with The Nap Meditation below.
Back to Femoral Version
Finally, with respect to femoral version angles in this particular pose, remember these tips:
????Hip external rotation is limited in excessive femoral anteversion.
????Hip internal rotation is limited in femoral retroversion.
????The knees may be flexed if there is an active tear, recent repair, flare-up, external or internal impingement, or hip range of motion needs to be limited.
????Alternately, use less degrees of freedom in the pose to minimize load transfer requirements. This means the hand will rest farther up the leg, closer to the hip, or even use other external supports like the wall or a chair.
The key to safe performance of triangle, as always and especially in absence of a thorough physical examination of the hip, is to listen to your body and err on the side of caution.
Some final tips for safe performance if you suspect you or a student or patient may have pathologic femoral version include:
????Avoid end range of motion in all poses, not just standing postures.
????Flex the knees in postures like Warrior I, II, Triangle, Extended Side Angle, and Revolved Triangle.
????Use a triplanar alignment for Triangle pose, as well as Extended Side Angle pose. Note: Warrior I, II, and Revolved Triangle use a different alignment.
Scaffolding: Building a Safer Triangle Pose
We are finally ready to practice Triangle Pose!
The Locks and Scaffolding Video are SNEAK PEEKS from the Premium MTY Video Library. If you’d like to have exclusive, lifetime access to all MTY Videos in one location, click here.
Note: Assessment and evaluation of the hip joint should be done by a licensed healthcare provider, preferably a physical therapist or orthopaedist.
Resources
- Protecting the Sacroiliac Joint in Yoga
- Protecting the Sacroiliac Joint in Yoga, Part II
- Live Practice! The New Warrior I & II (Hip Preservation, Not Hip Openers)
DISCLAIMER: YOU CAN DO ANY YOGA POSE however you feel is best for you. However, this particular Triangle pose is for protection and preservation, as well as maximizing, pelvic girdle function (hip, SIJ, low back, pelvic floor). This and any other videos I instruct do not constitute physical therapy or a patient-provider relationship. User assumes risk in performing this or any video. Please get the approval of your healthcare provider before doing this or any instructional movement video.


